
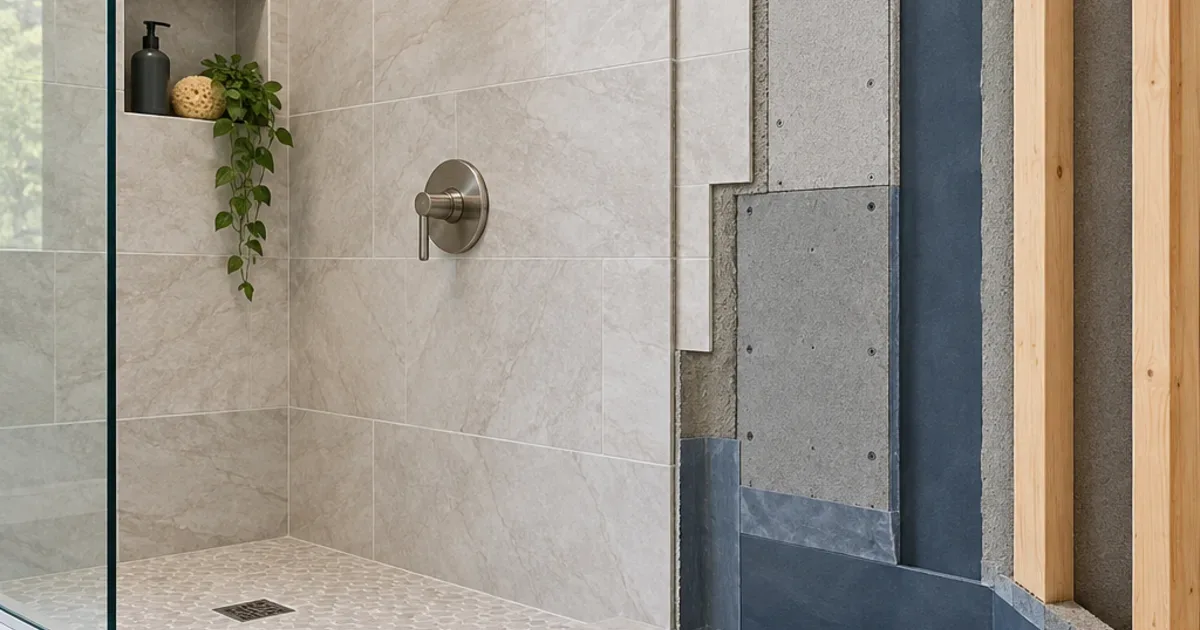
Tile and grout do not waterproof a shower. The layer behind them does. Grout is porous and tile joints let moisture through, so a shower stays dry only if a continuous waterproof membrane, a properly sloped base, and sealed transitions sit beneath the finish. That hidden assembly decides whether a shower lasts or quietly rots the framing behind it. If you're planning a larger renovation, such as kitchen remodeling in Atlanta, Georgia, give wet-area construction the same attention you give finishes. Water damage behind tile is expensive to find and to fix.
Why Tile and Grout Aren't Waterproof
Many homeowners assume glazed tile makes a shower watertight. The tile face does shed water, but a tiled wall is mostly joints, and those joints are where water gets in.
- Cement-based grout is porous. It absorbs water during every shower and releases it slowly. Sealers reduce absorption, but they don't turn grout into a waterproof barrier.
- Hairline cracks develop over time. Framing moves slightly with seasonal changes, and corners and changes of plane flex the most.
- Water vapor moves through materials. Warm, humid shower air pushes moisture into the wall even when nothing is visibly leaking.
So treat the tile as a wear surface. The waterproofing system underneath is the actual barrier.
What Sits Behind a Properly Built Shower
A durable shower wall or floor is a layered assembly. Each layer has a separate job.
1. Framing and Blocking
Studs need to be straight and solid. Blocking is installed wherever niches, grab bars, or glass doors will mount, so you don't later drill through a finished membrane looking for support.
2. Backer Board (Substrate)
Cement board, fiber-cement board, or foam-core boards replace drywall in wet areas. One distinction matters a lot:
- Water-resistant means the board won't fall apart when wet. Standard cement board is in this category. It tolerates water but lets it pass through.
- Waterproof means water can't pass through. Some foam boards are designed to be waterproof when their seams are sealed per the manufacturer.
Cement board by itself is a common point of confusion. It is not a waterproof barrier.
3. The Waterproof Membrane
This is the layer that actually keeps water out. The main options:
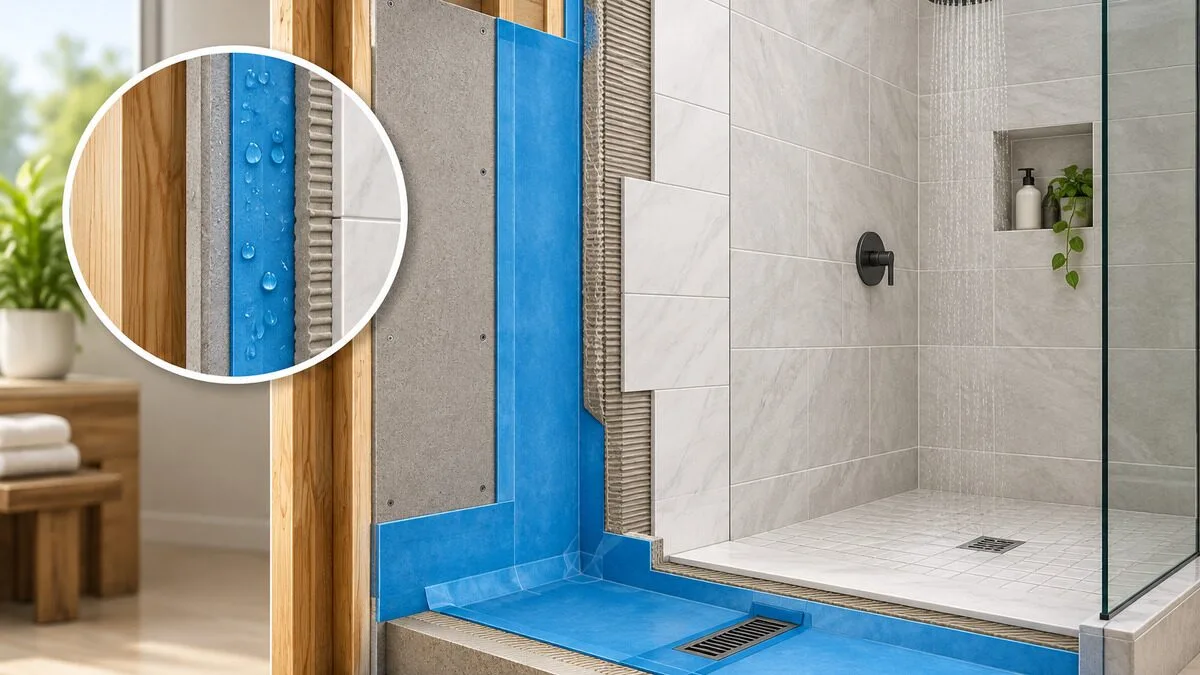
- Sheet membranes: thin plastic-composite sheets bonded to the substrate with thinset, with overlapped and sealed seams.
- Liquid-applied membranes: rolled or brushed on in coats, usually with fabric reinforcement at corners and seams.
- Traditional mortar bed with a shower pan liner: a liner sits under a mortar bed and directs water to the drain's weep holes.
Products sold as waterproof membranes for tile are commonly tested against the ANSI A118.10 standard. Check the product data sheet rather than relying on the label alone.
4. Sloped Base and Drain
Water has to reach the drain instead of pooling. A common guideline is about 1/4 inch of slope per foot toward the drain, though your local code and the product instructions govern. The membrane must connect to the drain in a way the system's manufacturer specifies. A gap here is one of the most common failure points.
5. Tile, Thinset, and Grout
These are the finish layers. Use thinset that's compatible with the membrane, since some membranes require specific mortars.
Comparing Waterproofing Approaches: Decision Criteria and Tradeoffs
There's no single best system. Choose based on the shower's design, the installer's experience, and how well the system's parts work together.
- Factor: Thickness consistency; Sheet Membrane: Factory-controlled; Liquid Membrane: Depends on applicator; Mortar Bed + Liner: Depends on mortar work
- Factor: Complex shapes (niches, benches); Sheet Membrane: More cutting and seams; Liquid Membrane: Easier to coat; Mortar Bed + Liner: Labor-intensive
- Factor: Cure time before tile; Sheet Membrane: Generally none; Liquid Membrane: Requires drying between coats; Mortar Bed + Liner: Mortar must cure
- Factor: Main risk; Sheet Membrane: Poorly sealed seams; Liquid Membrane: Coats applied too thin; Mortar Bed + Liner: Clogged weep holes, liner damage
Questions to ask when choosing:
- Is the whole assembly from one manufacturer, or at least approved to work together? Mixing components can void warranties and cause compatibility problems.
- Does the shower have a curbless entry, bench, or niche? Complex geometry favors systems with prefabricated corners and niches or liquid coatings.
- How will the installer verify liquid membrane thickness? Ask whether they use a wet-film gauge or follow the specified coverage rate.
- Will the floor be flood tested before tile goes down?
Common Waterproofing Mistakes
These errors usually stay hidden until damage appears months or years later:
- Doubling vapor barriers. Putting plastic sheeting behind the backer board and then a surface membrane on top can trap moisture between the two layers. Most systems call for one barrier, not two.
- Skipping corner and seam reinforcement. Inside corners and board seams move the most and need the manufacturer's banding or fabric.
- Unsealed penetrations. Valve bodies, shower heads, and niche edges need gaskets or sealant collars.
- Low or flat spots in the floor. Standing water keeps grout saturated and invites mildew.
- Stopping the membrane too low. Waterproofing should extend at least as high as water will reach. Steam showers need full coverage, including the ceiling, and vapor-rated products.
- Fastening through the membrane after tile. Drilling for accessories without blocking or proper sealing punctures the barrier.
- Skipping the flood test. Plugging the drain and filling the pan before tiling (commonly for about 24 hours, depending on local requirements) shows leaks while they're still cheap to fix.
Illustrative Example: Two Showers, Same Tile
This is a hypothetical scenario for explanation, not a real customer project.
Two neighbors install the same porcelain tile in identical shower stalls.
Shower A uses cement board with no membrane. The tile is sealed and looks perfect. Over time, water seeps through the grout and wicks through the board. The studs stay damp after every use. Eventually the homeowner notices loose tiles, a musty smell, and soft drywall in the hallway outside the shower.
Shower B uses the same tile over a fully sealed membrane. It has reinforced corners, gasketed pipe penetrations, a sloped base tied into a bonding-flange drain, and a passed flood test. Moisture still enters the grout, but the membrane stops it and the slope carries it away.
On day one the two showers look identical. The difference is entirely behind the tile.
Practical Steps Before Your Shower Is Tiled
Use this checklist when talking with an installer or inspecting progress:
- Ask which waterproofing system will be used and request its product name so you can read the installation instructions yourself.
- Confirm system compatibility. The drain, membrane, and thinset should be approved to work together.
- Photograph the membrane before tile goes up. Look for complete coverage, reinforced corners, and sealed penetrations. These photos are useful records later.
- Request a flood test of the floor and witness the result if you can.
- Check slope by setting a level on the base or pouring a little water to watch where it drains.
- Plan blocking for future accessories so nothing needs to penetrate the membrane later.
- Verify permit and inspection requirements with your local building department, since rules vary.
Wet-area details also show up elsewhere in the home. Surfaces near sinks see daily water exposure, which is one reason material choice matters in countertop service decisions. Whether a surface is porous, and how its seams are sealed, affects how long it lasts.
Conclusion
A shower's lifespan depends far more on the membrane, slope, drain connection, and sealed transitions than on the tile you can see. When you plan a remodel, ask which waterproofing system is being used, confirm the components are compatible, document the work before it's covered, and insist on a flood test. A practical next step is to make a short list of these questions before your project starts and review them with your contractor. You can explore remodeling resources and project ideas at homescabinet as you plan the wet areas and finishes of your home.
Frequently asked questions
Can I add waterproofing to an existing tiled shower without demolition?
Not reliably. Surface sealers and grout sealers reduce absorption but don't create a continuous barrier behind the tile. If the original shower was built without a membrane and shows signs of moisture, removing the tile and rebuilding the assembly is usually the dependable fix.
How can I tell if water is getting behind my shower tile?
Warning signs include loose or hollow-sounding tiles, grout that stays dark long after showering, recurring mold in the same joints, peeling paint or soft drywall on the wall outside the shower, and musty odors. Any of these is worth having a professional investigate before the damage spreads to framing or subfloor.
Is a tub surround as critical as a walk-in shower?
Walls above a tub still get regular spray, so they need a proper water-resistant or waterproof assembly. The membrane should overlap the tub flange the way the tub and membrane manufacturers specify. The base itself is less complicated because the tub handles drainage.
Should the grout be sealed if there's already a membrane?
Sealing cement grout is optional in many cases. It mostly helps with staining and cleaning, not waterproofing. Follow the grout manufacturer's guidance. Some epoxy and high-performance grouts don't need sealing.
Planning guidance from Homes Cabinet. Product specifications, site conditions and the agreed scope determine the right solution for your home. Illustrative examples are not project quotations or promises of a particular result.
← Explore more remodeling guides